Interface Overview
The SuperSplat Editor's interface appears as follows:
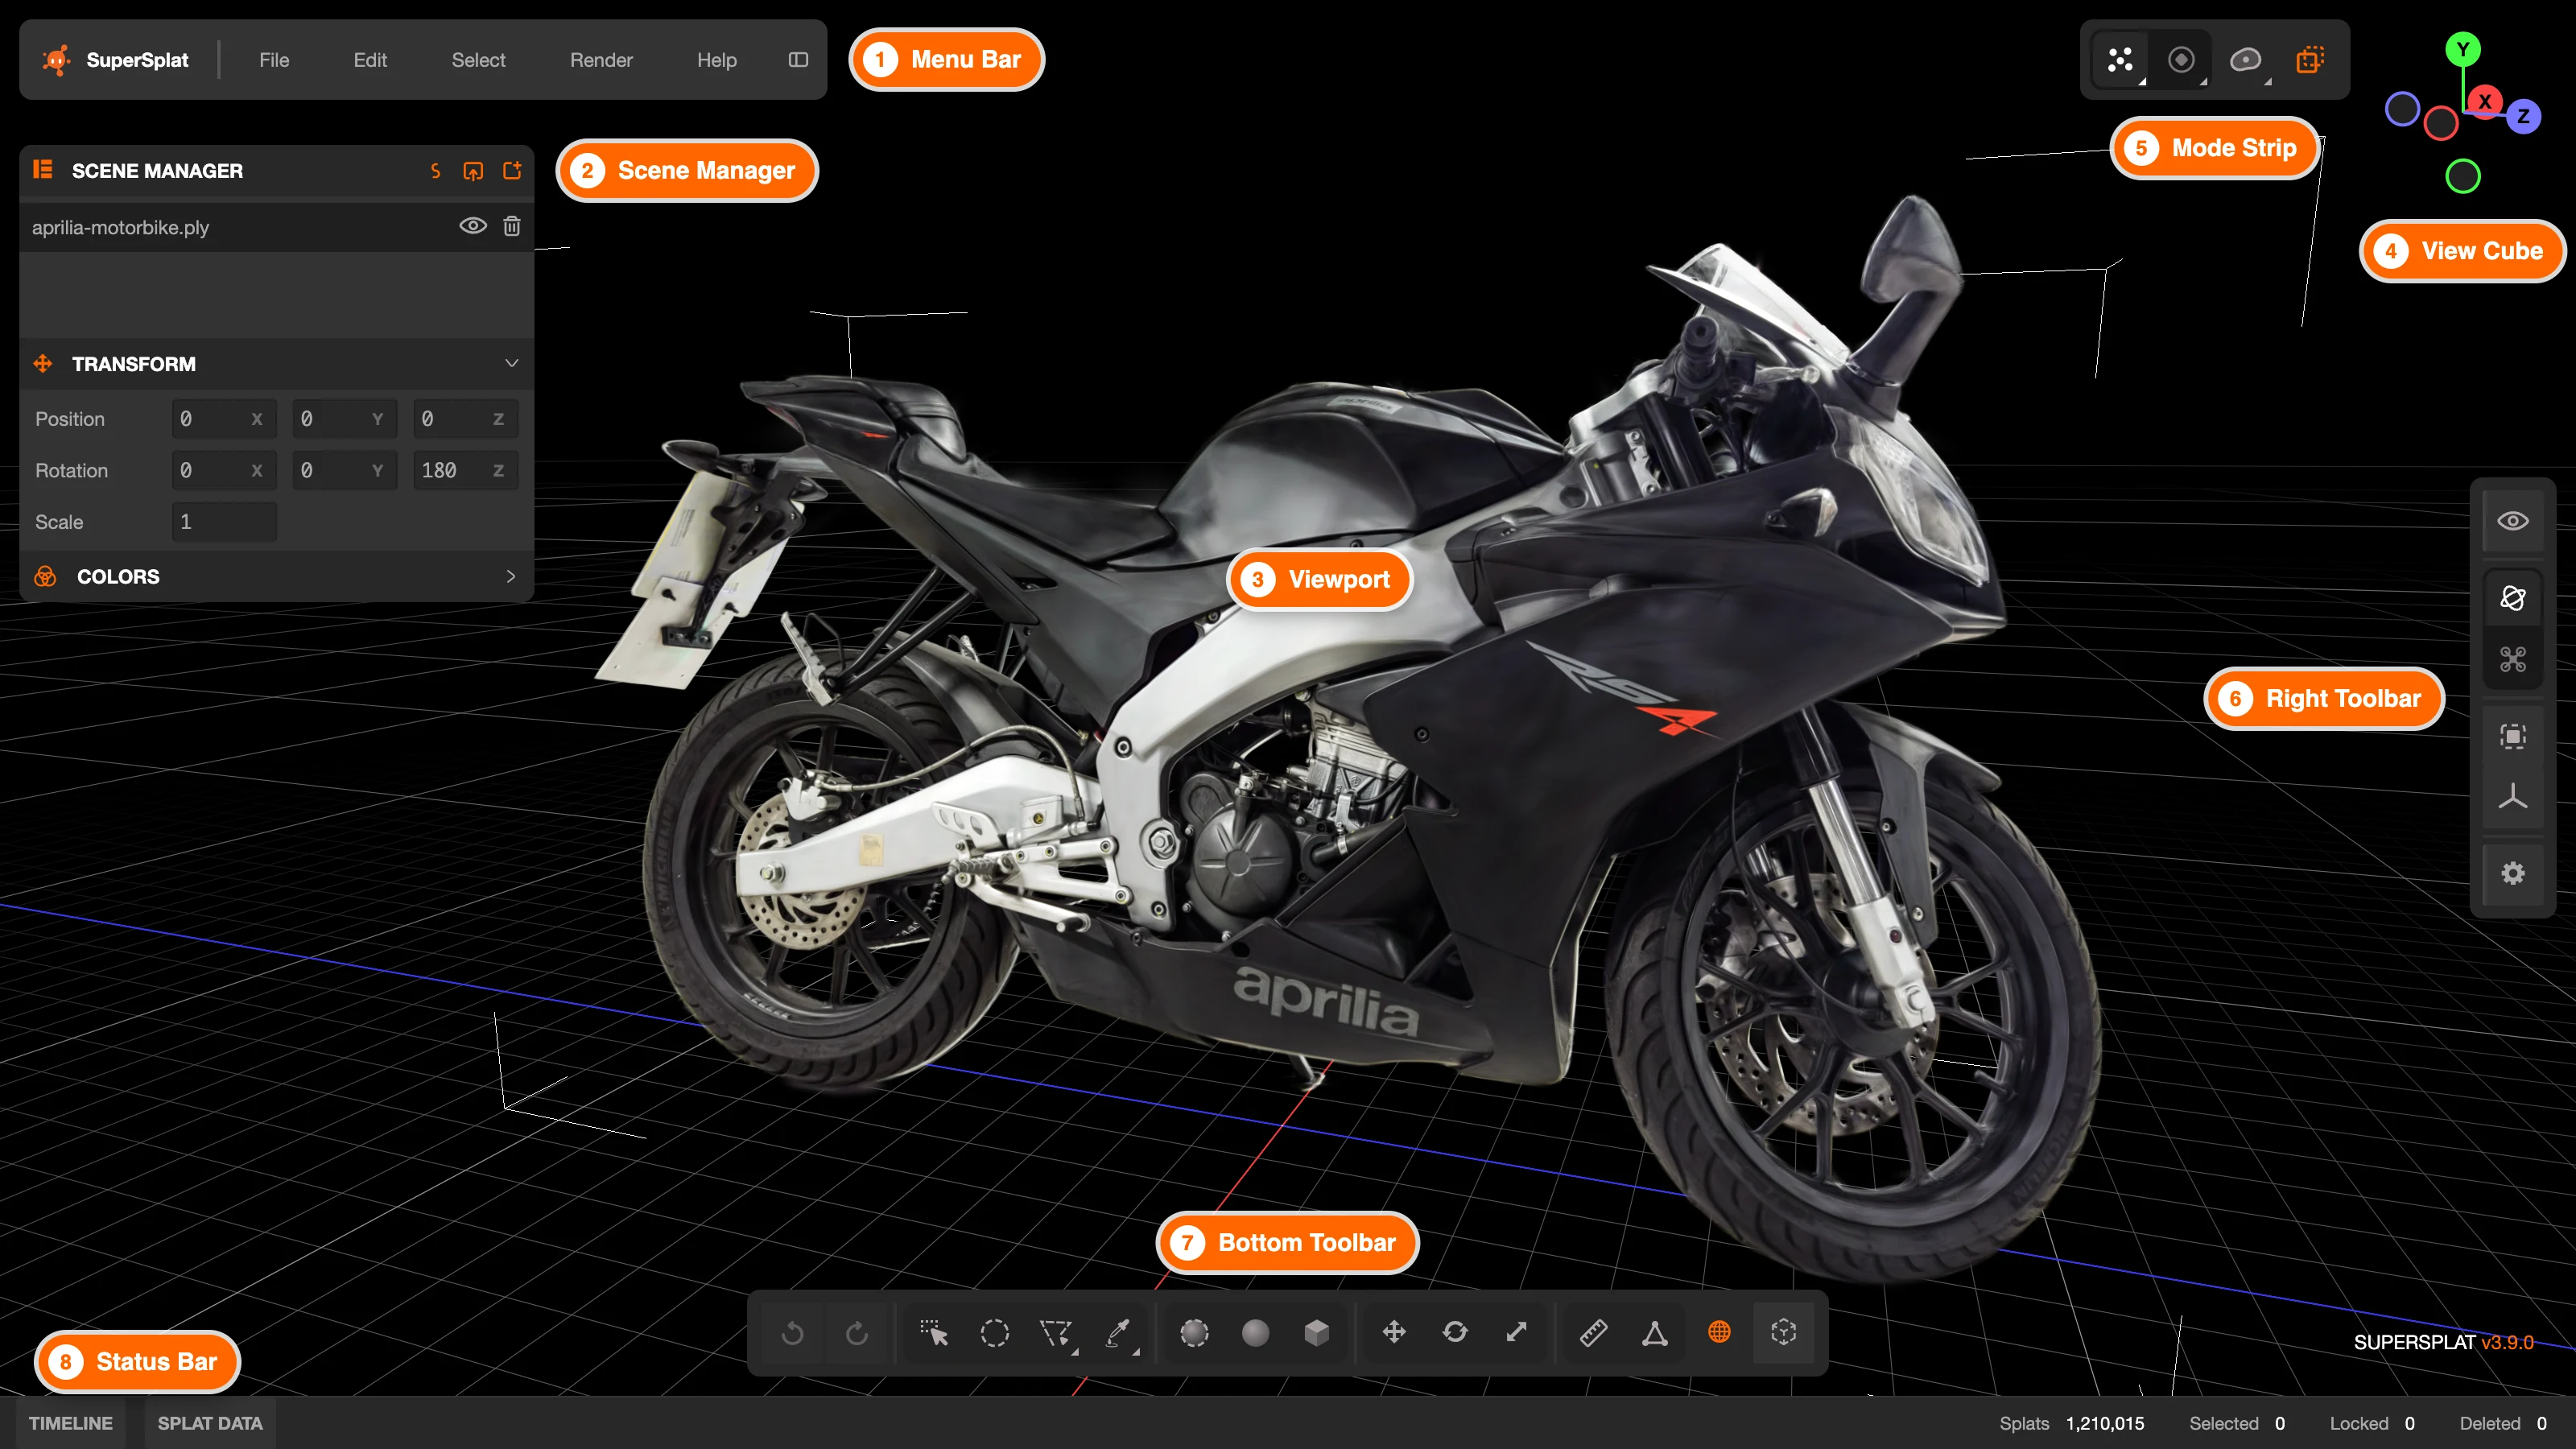
Interface Elements
The key elements of the interface are labeled:
Menu Bar
The Menu Bar gives you access to the most commonly used functions in the SuperSplat Editor. The SuperSplat logo at its left edge takes you back to superspl.at.
- File Menu: Create, open, and save
.ssprojprojects; import splats, including an Import Recent list; export to the supported formats and repeat the last export with Re-export; publish to superspl.at. - Edit Menu: Undo or redo changes, or duplicate or separate selected Gaussians into a new splat.
- Select Menu: Select all, none, or the inverse; Lock Selection, Unlock All, Delete Selection, and Reset Splat to restore deleted Gaussians.
- Render Menu: Render an image or a video of your currently loaded scene.
- Help Menu: Video tutorials, this user guide, the keyboard shortcuts reference, community links, and About SuperSplat.
Scene Manager
The Scene Manager lists the imported splats in the project. Click a row to choose the active splat, use the eye icons or Solo mode to control visibility, and use the collapsible Transform and Colors sections below the list for precise transforms and color grading. Right-click a section header or row to copy or paste its values. See Managing Splats for the complete workflow.
Viewport
The 3D viewport where you can visually edit your scenes. A grid helps you orient yourself in the scene. By default the grid lies in the XZ plane (with the world Y axis pointing upwards); the Overlays popup can draw the XY and YZ planes as well, in any combination. The X axis is colored red and the Z axis is blue. The grid uses meters, and its divisions adapt to your distance from the scene: 1 meter and 10 cm lines up close, with 100 m and 1 km lines appearing on large scenes.
View Cube
The View Cube is a gizmo that gives added control over the viewport camera. You can click on any of the circles to switch to an orthographic view of the scene from one of six directions. This can make it easier to make accurate selections in certain circumstances.
Mode Strip
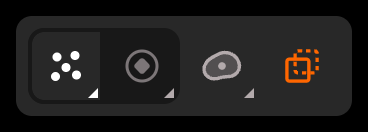
The small icon strip beside the View Cube decides what you see and what a selection hits. Its buttons have no labels; hover one for its name, shortcut, and a short description. From left to right:
| Control | Shortcut | Default | Description |
|---|---|---|---|
| Centers / Rings | M | Centers | The editing mode: selections pick Gaussians by their center points or by their footprints. Switching mode also turns Markers on. |
| Markers | Tab | Off | Shows the center or ring markers on the unselected Gaussians. When off, the scene renders plainly and selected Gaussians keep their indicators. |
| X-Ray | N | On | Selects through all depths. Turn it off to select only the visible surface. |
Press and hold Centers or Rings for that marker's size and its Splat Colors switch, or press and hold Markers for Markers Only, Tint Selection, and Outline Selection. See Selection Mode and X-Ray and Markers and Selection Display.
Right Toolbar
This vertical toolbar contains, from top to bottom:
- Overlays (eye icon) — opens the Overlays popup: grid, bounding box, camera poses, camera info, and diagnostics.
- Orbit Camera / Fly Camera — a two-option switch for the camera control mode (V).
- Frame Selection (F) and Reset Camera (Shift+F).
- Preferences (gear icon) — opens the Preferences popup.
Only one of the Overlays and Preferences popups is open at a time.
Bottom Toolbar
This horizontal toolbar contains, from left to right:
- Undo and Redo.
- The 2D selection tools: Rectangle, Brush, Polygon / Lasso, and Eyedropper / Flood. The last two buttons each hold a pair of tools: click to use the current one, or press and hold to switch to the other.
- The 3D selection tools: Sphere Brush, Sphere Selection, and Box Selection.
- Move, Rotate, and Scale.
- Measure and Orient, followed by the Use Local Orientation toggle (Shift+C) and Reset Pivot.
How the selection tools decide what they hit is set on the Mode Strip. See Selection and Cleanup and Transform, Measure and Align.
Status Bar
The bar along the bottom edge opens the Timeline (Ctrl+T) and Splat Data (Ctrl+D) panels and shows live counts of the active splat's Splats, Selected, Locked, and Deleted Gaussians. The Editor version is shown in the bottom-right corner of the viewport; click it to open the About dialog, which also lists your GPU and the versions of the PlayCanvas Engine, Splat Transform, and PCUI that the Editor uses.
Animation Timeline
The Timeline allows you to create and delete keyframes for the viewport camera. It also allows you to play back (or scrub through) the animation you have configured, along with any splat sequences you have imported.
Splat Data Panel
This panel visualizes the Gaussian data in the active splat as a histogram and lets you select ranges of values. See the Splat Data panel.
Overlays
The Overlays popup (the eye icon in the Right Toolbar) holds viewport helpers and diagnostics. Each row is a toggle; click anywhere on the row to flip it.
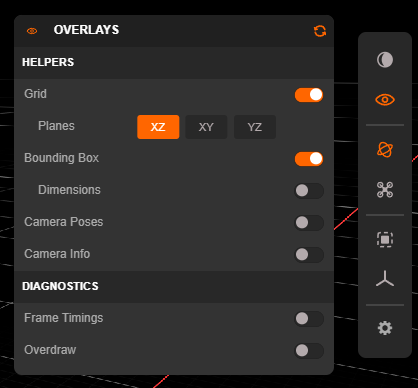
| Section | Control | Default | Description |
|---|---|---|---|
| Helpers | Grid (G) | On | Shows the reference grid. |
| Planes | XZ | Which grid planes are drawn: XZ, XY, and YZ, in any combination. The choice is saved with your preferences and in .ssproj projects. | |
| Bounding Box | On | Draws the bounding box of the active splat. | |
| Dimensions | Off | Labels the bounding box edges with their lengths in the viewport, and the Measure tool's line with its length. | |
| Camera Poses | Off | Draws a camera gizmo at every Timeline keyframe. | |
| Camera Info (I) | Off | Shows the editable camera position and target overlay. | |
| Diagnostics | Frame Timings | Off | Live GPU and CPU frame times (median, minimum, and 95th percentile over the last second) with a graph, and whether the last frame was rendered sorted or stochastic. |
| Overdraw | Off | Replaces the image with a heat map of how many Gaussians overlap each pixel, with a legend from 1 to over 1000. Red-to-white regions are where cleanup would help performance most. |
Click the reset icon in the popup's header to restore the Overlays defaults.
Preferences
The Preferences popup (the gear icon in the Right Toolbar) holds application-wide settings. They are saved in your browser and restored the next time you open the Editor. Hover a setting's name for a short description of what it does.
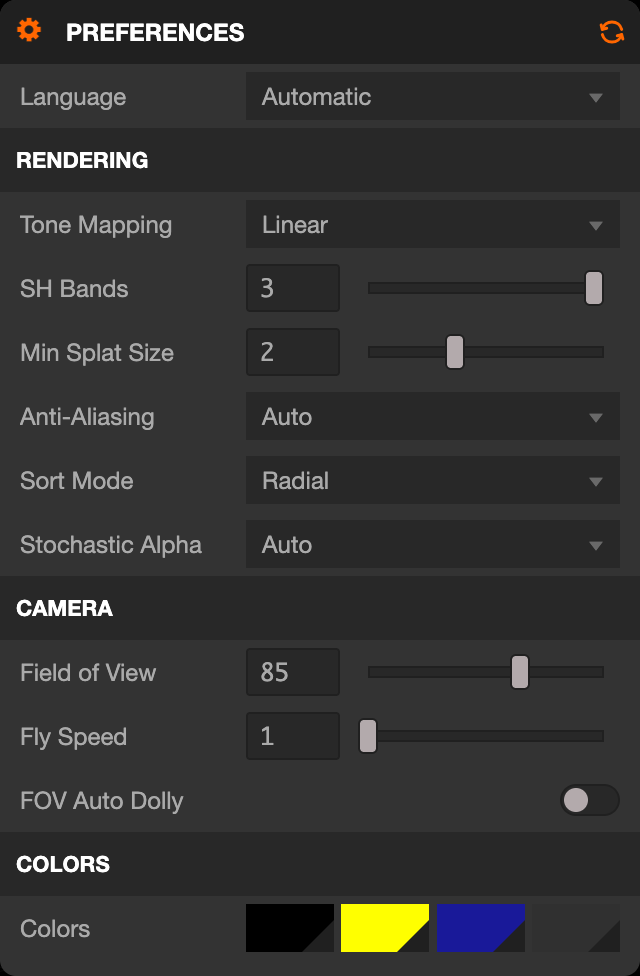
| Section | Setting | Default | Description |
|---|---|---|---|
| Language | Automatic | Interface language. See Language. | |
| Rendering | Tone Mapping | Linear | Viewport tone mapping curve: Linear, Neutral, ACES, ACES2, Filmic, or Hejl. |
| SH Bands | 3 | Spherical harmonic bands evaluated in the viewport (0–3). Lower values render faster and preview how a reduced-band export will look. | |
| Min Splat Size | 2 | Hides Gaussians that project smaller than this many pixels on screen (0–5), which speeds up large scenes. Lower it if small Gaussians leave gaps; values of 1.5 or less hide nothing. This affects the Editor viewport only: exported viewers always use 2. | |
| Anti-Aliasing | Auto | For splats trained with anti-aliasing, such as Mip-Splatting. Without it, they draw too bright. Auto follows the anti-aliasing tag stored in each file; On and Off override it for every splat. Unlike the other settings, this is saved with the project rather than as a preference, and a new scene starts at Auto. Exports are tagged to match what the viewport shows. | |
| Sort Mode | Radial | The order in which Gaussians are blended. Radial sorts by distance from the camera, which stays stable when the camera turns in place. Depth sorts along the view direction. Orthographic views always sort by depth. | |
| Stochastic Alpha | Auto | How heavy scenes are drawn while you move the camera. Disabled always draws depth-sorted, blended frames. Enabled always uses stochastic transparency, which needs no sorting and stays responsive on very large scenes at some cost in image quality. Movement uses stochastic frames only while the camera or a tool is moving and draws an exact sorted frame once the view settles. Auto keeps drawing sorted frames until one proves slow, then behaves like Movement. | |
| Camera | Field of View | 85° | Field of view of the viewport camera (10°–120°), measured across the viewport's longer side. See Camera Settings. |
| Fly Speed | 1 | Speed of WASD navigation in fly mode (0.1–30). | |
| FOV Auto Dolly | Off | Move the camera as the field of view changes so the subject keeps its framing. See Camera Settings. | |
| Colors | Background Color | Black | The viewport background. Also the default background of published scenes and exported viewers. |
| Selected Color | Yellow | The color of selected Gaussians' markers, the selection tint and outline, and the selected bars in the Splat Data histogram. | |
| Unselected Color | Blue | The color of unselected Gaussians' markers (unless they show Splat Colors) and the unselected bars in the histogram. | |
| Locked Color | Black, 5% opacity | Applied to locked Gaussians. The default leaves them dark and almost transparent. |
The four colors are the swatches in the Colors row; hover a swatch for its name. Loading an .ssproj project applies the view and camera settings saved in that project for the current session without replacing your stored preferences. Selecting File > New reapplies your preferences. To restore the factory settings, click the reset icon in the popup's header (Reset to Defaults). This also returns the interface language to Automatic. The Overlays popup has its own reset button.
Language
SuperSplat's interface is available in several languages. By default it follows your browser's language — the Automatic setting — but you can choose a specific language from the Language dropdown at the top of the Preferences popup (the gear icon in the Right Toolbar).
Switching language takes effect immediately. There is no page reload, so your loaded scene and any unsaved work are preserved. Your choice is remembered across sessions until you change it again or switch back to Automatic.
The following languages are supported:
- English —
en - Deutsch (German) —
de - Español (Spanish) —
es - Français (French) —
fr - 日本語 (Japanese) —
ja - 한국어 (Korean) —
ko - Português (Brasil) (Brazilian Portuguese) —
pt-BR - Русский (Russian) —
ru - 中文 (简体) (Simplified Chinese) —
zh-CN
Add a ?lng= query parameter set to one of the language codes listed above (for example, ?lng=ja) to pin the language for a shared link. This overrides both your saved choice and the browser default, so the link always opens in that language.
SuperSplat is open source, and its translations are plain JSON files under static/locales. Open an issue to request a new language, or open a pull request adding or improving a locale file.